Zesty Crunchy Dilly Beans Recipe: A Flavorful Pickling Adventure
In recent years, the art of pickling has experienced a remarkable resurgence as home cooks embrace the joys of preserving seasonal produce. The process of pickling not only enhances the flavors of fruits and vegetables but also allows home chefs to savor their favorite tastes year-round. One delightful addition to this culinary trend is zesty crunchy dilly beans. These vibrant green beans, infused with a zesty brine, provide a crisp and tangy treat that can elevate any meal—from salads to charcuterie boards, or even enjoyed straight from the jar.
Beyond their delicious taste, pickled vegetables like dilly beans offer a plethora of health benefits. They are rich in probiotics, which are essential for maintaining gut health, and their pickled state allows them to be stored for extended periods without losing their nutritional value. As a result, incorporating zesty crunchy dilly beans into your diet is not only a treat for the palate but also a smart choice for overall well-being.
In this article, we will guide you through the step-by-step process of creating your own zesty crunchy dilly beans at home. With just a handful of ingredients and a little time, you will be well on your way to enjoying this delightful pickled snack.
Understanding the Ingredients
To create the perfect zesty crunchy dilly beans, it’s essential to understand the ingredients involved in the recipe. Each component plays a significant role in the flavor and texture of the final product.
Fresh Green Beans:
The star of this recipe is undoubtedly the fresh green beans. Packed with vitamins A, C, and K, as well as fiber, these beans are not only nutritious but also provide a satisfying crunch. When selecting green beans, look for ones that are firm, vibrant in color, and free from blemishes. The ideal beans should be young and tender, ensuring that they retain their crispness throughout the pickling process.
Pickling Brine Components:
The brine is a crucial element in the pickling process, providing the tangy flavor that makes dilly beans so irresistible. Here’s a breakdown of the key ingredients:
– Distilled White Vinegar: This vinegar is commonly used in pickling due to its high acidity, which helps preserve the beans and provides a sharp, tangy flavor. The acidity of the vinegar is essential for creating a safe and shelf-stable product.
– Water: Water is necessary to balance the brine, ensuring that the flavors are not overly concentrated. The right ratio of vinegar to water is important for achieving the desired taste and preserving qualities.
– Kosher Salt: This type of salt is preferred for pickling because it dissolves easily and enhances the flavor of the beans without making them overly salty. It also helps to create the ideal texture by drawing out moisture from the beans during the pickling process.
– Granulated Sugar: A small amount of sugar is added to balance the acidity of the vinegar, providing a hint of sweetness that rounds out the flavor profile. Adjusting the sugar level can cater to personal taste preferences.
– Garlic: Fresh garlic cloves are added to the brine for their aromatic qualities. Garlic not only enhances the flavor but also offers health benefits, including antimicrobial properties.
– Dill Seeds and Sprigs: Dill is the traditional herb used in pickling and is what gives dilly beans their distinctive flavor. Both dill seeds and fresh dill sprigs can be used in this recipe, contributing to the overall aromatic experience.
– Red Pepper Flakes and Whole Spices: To customize your dilly beans, consider adding red pepper flakes for a bit of heat, or whole spices like black peppercorns and mustard seeds for added depth of flavor. These optional ingredients can be adjusted to suit your own palate.
With these ingredients in hand, you’re ready to dive into the preparation of your zesty crunchy dilly beans.
Preparing the Green Beans
Before you can pickle your green beans, they need to be properly cleaned and trimmed to ensure they look as good as they taste. Follow these detailed steps to prepare your green beans:
1. Cleaning: Start by rinsing the green beans under cool running water. This step is crucial for removing any dirt or pesticides that may be clinging to the beans. A gentle rub with your fingers will help ensure they are thoroughly cleaned.
2. Trimming: Once cleaned, the next step is to trim the ends of the green beans. Using a sharp knife or kitchen scissors, cut off the stem ends (the side opposite the tip) of each bean. This not only creates a more polished presentation but also prevents any tough or woody bits from affecting the texture of your pickled beans.
3. Blanching: Blanching is an essential step in preparing your green beans before pickling. This process helps maintain their vibrant color, firm texture, and nutritional value. To blanch, bring a large pot of water to a boil and prepare an ice bath in a large bowl filled with cold water and ice.
– Carefully add the trimmed green beans to the boiling water and let them cook for about 2-3 minutes. You want them to be bright green and slightly tender but still crisp.
– Once the time is up, immediately transfer the beans to the ice bath to stop the cooking process. This step is vital as it locks in the beans’ color and crunch.
4. Draining: After the beans have cooled completely in the ice water (which should take another 2-3 minutes), drain them well. Pat the beans dry with a clean kitchen towel to remove excess moisture before moving on to the pickling stage.
Crafting the Perfect Pickling Brine
With your green beans prepped and ready to go, it’s time to craft the pickling brine. Creating the perfect brine is key to achieving that signature tang and flavor in your zesty crunchy dilly beans. Follow these steps for a delicious brine:
1. Combine Ingredients: In a medium saucepan, combine distilled white vinegar, water, kosher salt, granulated sugar, and crushed garlic cloves. The standard ratio for a basic pickling brine is typically 1 part vinegar to 1 part water, but feel free to adjust based on your taste.
2. Heating the Brine: Place the saucepan over medium heat and stir the mixture gently. As the brine heats, the salt and sugar will dissolve, creating a smooth mixture. It’s essential to bring the brine to a gentle simmer, allowing the flavors to meld together, but avoid boiling it vigorously.
3. Infusing Additional Flavors: Once the salt and sugar have dissolved, you can add your dill seeds, fresh dill sprigs, and any optional spices like red pepper flakes, black peppercorns, or mustard seeds. Allow the brine to simmer for an additional minute to infuse these flavors into the liquid.
4. Cooling the Brine: After the brine has simmered and infused with spices, remove it from the heat and let it cool slightly. The brine should be warm but not hot when you pour it over the green beans, as pouring boiling liquid directly can cause the beans to become mushy.
With your brine ready and green beans perfectly prepped, you’re all set to move on to the final steps of the pickling process. In the next part of this article, we will cover how to jar your dilly beans effectively and the best practices for storing them to ensure maximum flavor and longevity. Stay tuned for the delicious conclusion to your zesty crunchy dilly beans adventure!
{{image_2}}
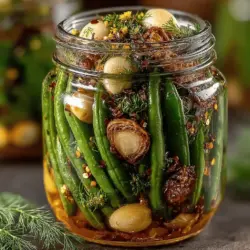
Packing the Jars for Pickling
To start your pickling process on the right note, it’s essential to ensure your canning jars are properly sanitized. This step is crucial for preserving the freshness and safety of your dilly beans.
Sanitizing Canning Jars
1. Wash Thoroughly: Begin by washing your jars, lids, and rings in hot, soapy water. Rinse them well.
2. Boiling Method: Place the cleaned jars in a large pot of boiling water for 10 minutes to sterilize. Ensure they are fully submerged.
3. Oven Method: Alternatively, you can place the jars in an oven at 200°F (93°C) for 20 minutes. This method is effective and ensures that the jars are dry when you fill them.
4. Keep Warm: After sanitizing, keep the jars warm until you’re ready to fill them. This helps prevent the glass from cracking when hot brine is added.
Packing Green Beans
Once your jars are sanitized, it’s time to pack in those vibrant green beans. The way you pack them can influence both the visual appeal and the flavor infusion.
1. Trim and Prepare: Ensure your green beans are trimmed to fit your jars. Aim for a length that allows them to stand upright, approximately 4 to 5 inches.
2. Pack Tightly: Gently yet firmly pack the green beans in the jars. This tight packing not only looks appealing but also helps the brine circulate effectively, enhancing the overall flavor.
3. Incorporate Fresh Dill: Add fresh dill sprigs between the layers of beans. This aromatic herb significantly amplifies the flavor profile of your pickled beans and adds a lovely presentation. Aim for a generous handful per jar.
Pouring and Sealing the Dilly Beans
With your jars packed, it’s time to add the hot brine. This step requires care to avoid spills and ensure that each jar is perfectly sealed.
Ladling the Hot Brine
1. Using a Funnel: Place a canning funnel over the opening of your jar. This will help you pour the hot brine without making a mess.
2. Fill with Brine: Carefully ladle the hot brine into each jar, covering the beans completely. Leave about ½ inch of headspace at the top of the jar. This gap is important for the expansion of the contents during the cooling process.
3. Remove Air Bubbles: After filling, use a clean utensil (like a chopstick or a bubble remover tool) to gently press down on the beans and release any trapped air bubbles. This helps ensure a tight seal.
Sealing the Jars
1. Wipe the Rims: Before sealing, wipe the rims of the jars with a clean, damp cloth to remove any residue that could interfere with the seal.
2. Apply Lids and Rings: Place the sterilized lids on each jar and screw on the rings until they are fingertip-tight. Avoid over-tightening, as this can prevent air from escaping during processing.
3. Cooling and Refrigeration: Allow the jars to cool at room temperature. Once cooled, store them in the refrigerator. The flavors will develop over time, typically reaching their peak after about a week.
Serving Suggestions
Now that your zesty crunchy dilly beans are ready, it’s time to enjoy them! This versatile pickle can enhance a variety of dishes and occasions.
As a Side Dish
Dilly beans make a refreshing side dish to accompany grilled meats. Their zesty flavor complements the smoky profile of barbecued chicken or steak. Simply serve them chilled on the side, or toss them into a summer salad for an added crunch.
Inclusion in Charcuterie Boards
These pickled beans are also a vibrant addition to charcuterie boards. Their bright green color and crunchy texture provide a delightful contrast to rich cheeses and cured meats. Pair them with olives, crackers, and a selection of spreads for an enticing appetizer spread.
Pairing Suggestions with Different Cuisines
Consider the cuisine when serving your dilly beans. They pair excellently with Mediterranean dishes, adding a zesty kick to falafel or gyros. For a Southern twist, serve them alongside fried chicken or cornbread. They can also enhance Asian-inspired meals, providing a tangy crunch to noodle bowls or stir-fries.
Storing Your Dilly Beans
To maintain the quality and flavor of your pickled beans, proper storage is essential.
Refrigeration Practices
Store your dilly beans in the refrigerator, where they will remain fresh for several months. Always ensure the jars are sealed tightly after each use to prevent contamination.
Shelf Life of Pickled Vegetables
When stored correctly, pickled vegetables like dilly beans can last anywhere from 3 to 6 months. However, their flavor and texture may begin to change after the first few weeks, becoming increasingly tangy and soft.
Flavor Evolution
As the weeks go by, you’ll notice the flavors of your dilly beans evolve. The initial sharpness of the vinegar may mellow, allowing the dill and garlic flavors to shine through more prominently. Taste them periodically to discover your preferred flavor profile.
Nutritional Benefits of Pickled Vegetables
Eating pickled vegetables like dilly beans comes with several health benefits, making them not just a tasty addition to meals, but a nutritious one too.
Overview of Health Benefits
Pickled green beans are low in calories and high in fiber, making them a great snack option. They provide essential vitamins and minerals, including Vitamin C and potassium, contributing to overall health.
Probiotics and Gut Health
Fermented pickled vegetables, especially those that undergo a natural fermentation process, are rich in probiotics. These beneficial bacteria support gut health and digestion, helping to maintain a balanced microbiome. While quick pickles like dilly beans may not have as many probiotics as traditionally fermented foods, they still offer digestive benefits.
Low-Calorie Count and High Fiber Content
One cup of raw green beans contains approximately 31 calories and 3 grams of fiber. Pickling them retains most of these nutritional benefits while adding a flavorful twist. This makes dilly beans a guilt-free addition to your diet, perfect for snacking or as part of a meal.
Conclusion
Making zesty crunchy dilly beans is a straightforward yet rewarding process that enhances your meals with vibrant flavors. The step-by-step approach ensures that even novice picklers can successfully create this delightful treat.
Experiment with variations by adding spices, garlic, or even different herbs to customize your brine. Enjoy the deliciously tart and crunchy beans in various dishes, and relish the satisfaction of home pickling. Not only do you get to savor the unique flavors, but you also contribute to a sustainable food practice that reduces waste and promotes healthy eating. Embrace the joy of pickling, and let these zesty dilly beans inspire your culinary adventures!