
Introduction
Garlic Bliss Crunch Sticks are an irresistible culinary creation that brings together the delightful crunch of freshly baked breadsticks and the aromatic essence of garlic. These homemade treats are not just a side dish; they are a flavorful addition that can elevate any meal, whether served as an appetizer, a snack, or alongside your favorite pasta. The crisp exterior combined with a soft, airy interior makes these breadsticks a perfect accompaniment to soups, salads, or even as a standalone indulgence.
The appeal of Garlic Bliss Crunch Sticks lies not only in their delightful flavor but also in the experience of making them from scratch. There’s something truly satisfying about kneading the dough, watching it rise, and then enjoying the warm, aromatic breadsticks straight from the oven. They embody the spirit of home cooking, where the kitchen fills with enticing scents that beckon friends and family to gather around the table.
The Allure of Homemade Breadsticks
Homemade breadsticks have a unique charm that cannot be replicated by store-bought versions. The process of creating them from scratch is both an art and a science, blending simple ingredients into a culinary masterpiece. There’s a certain joy in the tactile experience of kneading dough, feeling it come together under your hands, and transforming basic elements into something special.
As the breadsticks bake, the aroma of garlic and herbs wafts through the air, creating an inviting atmosphere that draws everyone in. This tradition of baking breadsticks is celebrated in various cuisines around the globe. In Italy, for instance, breadsticks known as “grissini” are often served as a starter, while in American households, breadsticks have become a beloved side dish to accompany pasta and salads. Their versatility allows them to transition seamlessly from casual snacks to elegant appetizers, making them a staple in many culinary traditions.
Understanding the Ingredients
To create the perfect Garlic Bliss Crunch Sticks, it’s essential to understand the role of each ingredient in the recipe. Each component contributes to the overall texture, flavor, and success of the dish.
– All-Purpose Flour: This is the backbone of the breadsticks, providing structure and stability. The protein content in all-purpose flour helps develop gluten, which gives the breadsticks their chewy texture.
– Active Dry Yeast: Yeast is a living organism that ferments sugars, producing carbon dioxide and causing the dough to rise. It’s essential for creating the light and airy texture characteristic of freshly baked bread.
– Granulated Sugar: Sugar plays a dual role in this recipe. It not only adds a hint of sweetness but also activates the yeast, providing it with the energy needed to start the fermentation process.
– Salt: Often overlooked, salt is crucial in enhancing the flavor of the breadsticks. It also strengthens the dough, helping to control yeast activity and improve the overall texture.
– Warm Water: The temperature of the water is vital for yeast activation. Ideally, it should be between 100°F to 110°F (37°C to 43°C) to create an environment where the yeast can thrive without being killed by excessive heat.
– Olive Oil: This ingredient contributes both flavor and moisture to the dough. It creates a tender texture and helps keep the breadsticks fresh.
– Fresh Garlic: The star ingredient, fresh garlic, infuses the breadsticks with a robust flavor. Its aromatic profile transforms these simple breadsticks into a gourmet experience.
– Dried Herbs: Typically, oregano and basil are used in this recipe. These herbs complement the garlic, adding layers of flavor that elevate the dish.
– Crushed Red Pepper Flakes: For those who enjoy a bit of heat, crushed red pepper flakes can be added to bring a spicy kick to the breadsticks.
– Parmesan Cheese: Grated Parmesan adds a savory depth to the flavor profile while also contributing to the crunchy texture of the crust.
– Fresh Parsley: Used as a garnish, fresh parsley not only adds a pop of color but also a hint of freshness that balances the richness of the other ingredients.
Step-by-Step Process for Making Garlic Bliss Crunch Sticks
Now that you have a solid understanding of the ingredients, it’s time to dive into the step-by-step process of making Garlic Bliss Crunch Sticks.
Preparing the Dough
The first step in creating these delectable breadsticks is preparing the dough. Start by measuring out warm water and sprinkling the active dry yeast and granulated sugar into it. Stir gently and let the mixture sit for about 5 to 10 minutes. During this time, the yeast will begin to activate, foaming up and creating a bubbly surface, indicating that it’s ready to work its magic.
Once the yeast is activated, in a large mixing bowl, combine the all-purpose flour and salt. Make a well in the center and pour in the yeast mixture along with the olive oil. Using a wooden spoon or your hands, mix the ingredients until they begin to come together. You’re aiming for a shaggy dough that holds its shape but isn’t overly sticky.
Next, transfer the dough to a floured surface and start kneading. This step is crucial for developing the gluten, which will give your breadsticks their characteristic chewy texture. Knead the dough for about 8 to 10 minutes, or until it becomes smooth and elastic. If the dough is too sticky, sprinkle in a little extra flour as needed, but be careful not to overdo it, as too much flour can lead to dense breadsticks.
Once the dough reaches the desired consistency, shape it into a ball and place it in a lightly greased bowl. Cover the bowl with a clean kitchen towel or plastic wrap and let it rise in a warm, draft-free spot for about 1 to 1.5 hours, or until it has doubled in size. This first rise is essential for developing the flavor and texture of the breadsticks.
By understanding the ingredients and following these initial steps, you’re well on your way to creating a batch of Garlic Bliss Crunch Sticks that will impress your family and friends. As the dough rises and the aromas begin to fill your kitchen, you’ll be one step closer to enjoying these delightful homemade treats.
{{image_2}}
Garlic Bliss Crunch Sticks are not just a treat for the senses; they are an experience that brings warmth and comfort to any meal. In this part of the recipe, we will guide you through the essential steps to create these irresistible breadsticks, from the environment needed for the dough to rise, to the final garnishing touches that elevate their presentation. Let’s delve into the heart of the preparation process.
Creating the Perfect Environment for Dough Rising
To achieve the best results with your Garlic Bliss Crunch Sticks, creating an ideal environment for the dough to rise is crucial. Yeast thrives in warm conditions, making it essential to provide the right temperature for fermentation. Here are some effective tips to create a warm space for your dough:
– Warm Oven: Preheat your oven to the lowest setting (usually around 200°F or 93°C) for just a few minutes. Once warmed, turn it off and place your covered bowl of dough inside to rise. The residual heat will create an optimal environment.
– Sunny Spot: If it’s a sunny day, place your dough bowl near a window where it can soak up some natural warmth. Ensure it is covered with a clean kitchen towel or plastic wrap to keep it moist.
– Microwave Trick: Place a cup of hot water in the microwave along with the dough (covered). The steam from the water will keep the environment warm and humid, promoting a good rise.
By ensuring a warm and cozy space, your dough will rise beautifully, resulting in fluffy, airy breadsticks.
Preheating the Oven
An essential step in baking is preheating your oven. This process not only prepares the oven for consistent cooking but also seals in the moisture of the dough when it hits the heat. Here’s how to do it effectively:
1. Set the Oven Temperature: Preheat your oven to 375°F (190°C) — this is the ideal temperature for baking breadsticks to achieve a golden-brown exterior while ensuring they cook through.
2. Prepare the Baking Sheet: Line your baking sheet with parchment paper before preheating. This step prevents the breadsticks from sticking and ensures even baking. If you don’t have parchment paper, lightly grease the baking sheet with olive oil or cooking spray.
Preparing the Garlic Topping
The garlic topping is what truly elevates these breadsticks, providing a burst of flavor that complements the soft, chewy texture of the dough. Here’s how to prepare it:
1. Sautéing Garlic: In a small saucepan, heat a couple of tablespoons of olive oil over medium heat. Once hot, add minced garlic (about 4-5 cloves) and cook until fragrant, which should take about 1-2 minutes. Be cautious not to burn the garlic, as it can turn bitter.
2. Adding Herbs: Incorporate freshly chopped herbs, such as parsley or oregano, into the sautéed garlic. The aromatic oils released during this process will infuse your breadsticks with a rich, savory flavor.
3. Cooling the Mixture: Once the garlic and herbs are perfectly sautéed, remove the pan from heat and let the mixture cool slightly. This step is important to prevent the hot oil from cooking the dough when applied.
Shaping the Breadsticks
Shaping your dough properly ensures that your Garlic Bliss Crunch Sticks bake evenly and have a uniform appearance. Here are some techniques to get it right:
1. Rolling the Dough: On a lightly floured surface, turn out your risen dough. Gently press it down to remove excess air and divide it into equal portions, depending on how many sticks you want to make (typically 12-16).
2. Forming Uniform Sticks: Roll each portion into a rope about 6-8 inches long and 1 inch thick. Use both hands to gently roll the dough, applying even pressure from the center to the ends.
3. Keeping Shape Consistent: To ensure even cooking, try to keep the thickness uniform throughout each stick. This consistency will help them bake evenly, avoiding any undercooked or overcooked pieces.
Coating and Placing the Breadsticks
Once shaped, it’s time to coat your breadsticks with the delicious garlic mixture and prepare them for baking. Follow these steps:
1. Dipping in Garlic Mixture: Take each shaped stick and dip it into the sautéed garlic and herb mixture, ensuring it’s well coated. This not only adds flavor but also creates a beautiful crust when baked.
2. Spacing on the Baking Sheet: Place the coated breadsticks on the prepared baking sheet, leaving enough space between each stick to allow for expansion. This is crucial, as the dough will rise again during the baking process.
Adding Cheese
For an extra layer of flavor, Parmesan cheese is a perfect addition to your Garlic Bliss Crunch Sticks. Here’s how to incorporate it:
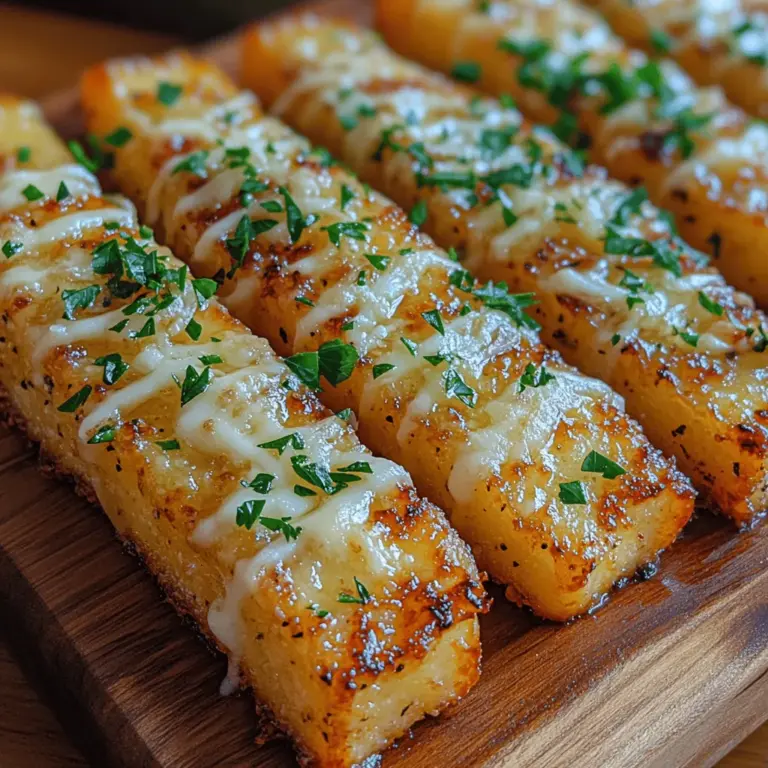
1. Sprinkling Technique: After placing the sticks on the baking sheet, use a fine grater to sprinkle freshly grated Parmesan cheese over the top of each breadstick. This not only enhances the flavor but also adds a delightful cheesy crust.
2. Ensuring Adherence: To help the cheese stick, gently press down on each stick after sprinkling to ensure it adheres to the garlic coating.
Second Rise
Allowing the breadsticks to rise again before baking is key to achieving that perfect fluffy texture. Here’s what you need to do:
1. Covering the Breadsticks: Lightly cover the baking sheet with a kitchen towel or plastic wrap to prevent air from drying the dough.
2. Timing: Let the breadsticks rise for about 20-30 minutes in a warm place until they puff up slightly. This second rise will result in a lighter texture once baked.
Baking the Breadsticks
Now comes the exciting part — baking your Garlic Bliss Crunch Sticks! Here’s how to monitor the process:
1. Placing in the Oven: Once the second rise is complete, bake the breadsticks in your preheated oven for 15-20 minutes, or until they are golden brown.
2. Visual Cues for Doneness: Keep an eye on the color; they should be a lovely golden hue, and the aroma of garlic and cheese will fill your kitchen. If the tops brown too quickly, you can cover them loosely with aluminum foil.
Garnishing and Serving
The final touches on your Garlic Bliss Crunch Sticks can make all the difference. Here’s how to garnish and serve them beautifully:
1. Adding Fresh Parsley: Once out of the oven, sprinkle chopped fresh parsley over the hot breadsticks for a pop of color and flavor. This not only enhances the look but also adds freshness.
2. Serving Suggestions: Serve your breadsticks warm, alongside dips such as marinara sauce, garlic butter, or even a creamy ranch. They pair beautifully with soups, salads, or as a delightful appetizer for any meal.
The Versatility of Garlic Bliss Crunch Sticks
Garlic Bliss Crunch Sticks shine in a multitude of settings. They are perfect for family dinners, where their warm, inviting aroma fills the home, or as a crowd-pleasing appetizer at parties. Their versatility allows them to complement a variety of dishes, including:
– Pairing with Soups: These breadsticks make an excellent accompaniment to creamy tomato soup or hearty minestrone, enhancing the meal with their garlicky goodness.
– Serving with Dips: Their crunchy exterior and soft interior make them ideal for dipping into sauces, such as marinara, pesto, or even a smooth hummus.
– Casual Gatherings: Whether it’s a game night or a casual get-together with friends, Garlic Bliss Crunch Sticks will impress your guests and enhance the overall dining experience.
Nutritional Insights
While Garlic Bliss Crunch Sticks are a delicious treat, it’s good to be aware of their nutritional aspects. Here’s a brief overview:
– Caloric Content: Each breadstick typically contains approximately 120-150 calories, depending on the ingredients used and portion size.
– Fresh Ingredients: Using fresh garlic, herbs, and high-quality olive oil not only enhances flavor but also adds nutritional benefits, including antioxidants and healthy fats.
– Dietary Considerations: These breadsticks can be adapted for various diets by using gluten-free flour or low-fat cheese alternatives, making them accessible to a wider audience.
Conclusion
Making Garlic Bliss Crunch Sticks at home is not only a rewarding culinary experience but also a delightful way to elevate any meal. With their warm, garlicky flavor and crunchy texture, these breadsticks are sure to become a favorite in your kitchen. By following the steps outlined above, you can create a batch that not only complements your meals but also brings joy to those who enjoy them. So gather your ingredients, unleash your inner baker, and indulge in the bliss of homemade Garlic Crunch Bliss Sticks!
