
Jalapeño peppers have carved a significant niche in culinary traditions worldwide, celebrated for their vibrant flavor and versatility. From spicy salsas to zesty sauces, these peppers add a distinctive kick that elevates countless dishes. Whether you enjoy them fresh, roasted, or pickled, jalapeños are a staple ingredient that can enhance everything from tacos to sandwiches. In this article, we will explore the delightful recipe for Quick & Zesty Jalapeño Pepper Treats, a perfect way to enjoy this beloved pepper in a new form.
This recipe is not only quick to prepare but also serves as a versatile addition to a variety of meals. Pickled jalapeños can be used as a topping for burgers, a zesty addition to salads, or even a flavorful condiment for your favorite dishes. By making your own pickled jalapeños at home, you have complete control over the ingredients and flavor profile, ensuring freshness and quality that store-bought options often lack.
The Importance of Homemade Pickling
Homemade pickling is more than just a method of preservation; it’s a time-honored tradition that enhances the flavor and extends the shelf life of vegetables. When you pickle jalapeños, you capture their vibrant taste and infuse them with a tangy brine, resulting in a delicious product that can be enjoyed for months. The process also allows you to experiment with different spices and flavorings, tailoring the recipe to suit your preferences. With the right techniques, pickling can transform simple ingredients into extraordinary culinary delights.
Understanding Jalapeños
Jalapeños are medium-sized chili peppers that belong to the Capsicum annuum species. Known for their bright green color and mildly spicy flavor, they are a popular choice in various culinary applications. The heat level of jalapeños can vary significantly, typically ranging from 2,500 to 8,000 Scoville heat units, making them a suitable option for those who enjoy a bit of spice without overwhelming heat.
In addition to their flavor, jalapeños offer several nutritional benefits. They are low in calories and packed with vitamins A, C, and K, as well as essential minerals like potassium and manganese. The capsaicin found in jalapeños also has been linked to various health benefits, including improved metabolism and pain relief. With their unique flavor profile and nutritional advantages, jalapeños are a fantastic addition to a balanced diet.
When selecting jalapeños for your Quick & Zesty Jalapeño Pepper Treats, it’s essential to recognize the different varieties available. While most recipes call for the classic green jalapeño, you may also encounter yellow, red, and even chocolate jalapeños, each with its distinct flavor and heat level. For a more robust kick, opt for the red jalapeño, which is fully ripened and often sweeter than its green counterpart.
Why Pickling?
The art of pickling dates back thousands of years, serving as a method for preserving food long before refrigeration was commonplace. By immersing vegetables in a brine solution, pickling inhibits the growth of harmful bacteria while enhancing the flavor profile of the produce. This process not only extends the shelf life of vegetables but also creates a unique taste that can elevate a variety of dishes.
When it comes to pickling jalapeños, the benefits are manifold. Pickled jalapeños add a zesty punch to sandwiches, tacos, nachos, and salads, transforming ordinary meals into extraordinary feasts. They can also be enjoyed straight from the jar as a tangy snack. The balance of acidity from the vinegar and the heat from the peppers makes pickled jalapeños a delightful contrast that tantalizes the taste buds.
Essential Ingredients for Quick & Zesty Jalapeño Pepper Treats
To create the perfect Quick & Zesty Jalapeño Pepper Treats, you’ll need a few essential ingredients. Each component contributes to the overall flavor and texture of the final product, so it’s crucial to select high-quality ingredients for the best results.
Fresh Jalapeño Peppers
The star of this recipe is, of course, the fresh jalapeño peppers. When selecting jalapeños, look for firm, glossy peppers that are deep green in color. Avoid any that show signs of wrinkling or blemishes, as these may indicate that the peppers are past their prime. To ensure maximum freshness, store your jalapeños in a paper bag in the refrigerator, where they can last for about a week.
Distilled White Vinegar
Distilled white vinegar plays a vital role in the pickling process. It provides the necessary acidity to create a tangy brine that preserves the jalapeños and enhances their flavor. When choosing vinegar, opt for a high-quality distilled white vinegar with at least 5% acidity to ensure effective pickling.
Salt and Sugar
Salt and sugar are essential for balancing flavors in the brine. Salt acts as a preservative, drawing out moisture from the jalapeños while enhancing their natural flavors. Sugar, on the other hand, helps to offset the heat of the peppers and adds a subtle sweetness to the brine. The right balance of salt and sugar will ensure a harmonious taste in your pickled jalapeños.
Spices and Seasonings
To elevate your Quick & Zesty Jalapeño Pepper Treats, you can incorporate a variety of spices and seasonings. Common additions include garlic powder, black peppercorns, cumin seeds, crushed red pepper flakes, and turmeric powder. These ingredients add depth and complexity to the flavor profile, making your pickled jalapeños truly exceptional. Feel free to experiment with different spices to find your perfect blend.
Mason Jars
Proper storage is crucial for preserving the freshness of your pickled jalapeños. Sterilized mason jars are ideal for this purpose, as they provide an airtight seal that keeps the brine intact. Before use, make sure to thoroughly clean the jars and lids in hot, soapy water, and then sterilize them by boiling them in water for 10 minutes. This step is essential to prevent bacterial growth and ensure the longevity of your pickled treats.
Step-by-Step Instructions for Preparation
Now that you have your ingredients ready, it’s time to prepare your jalapeños for pickling. The initial steps are crucial to ensure that your Quick & Zesty Jalapeño Pepper Treats turn out perfectly.
Preparing the Jalapeños
Start by washing the jalapeños under cold running water to remove any dirt or impurities. Once cleaned, it’s time to slice them for pickling. Depending on your preference, you can either slice them into rings or keep them whole. For a milder flavor, remove the seeds and membranes, as these contain most of the pepper’s heat. If you enjoy a spicier kick, feel free to leave the seeds intact.
Using a sharp knife, carefully slice the jalapeños to your desired thickness. Thinner slices will pickle more quickly and absorb flavor more effectively, while thicker slices will retain more crunch. Once sliced, place the jalapeños in a bowl and set them aside while you prepare the brine.
In the next section, we will guide you through the process of creating the perfect pickling brine and the final steps to complete your Quick & Zesty Jalapeño Pepper Treats. Stay tuned for an exciting culinary adventure that will bring a burst of flavor to your kitchen!
{{image_2}}
Tips for Handling Jalapeños Safely to Avoid Irritation
When working with jalapeños, it’s essential to handle them with care to avoid skin irritation or discomfort. Here are some tips to ensure a safe cooking experience:
1. Wear Gloves: Always wear disposable gloves when slicing or handling jalapeños. This protects your skin from the capsaicin, the compound responsible for the heat.
2. Avoid Touching Your Face: After handling jalapeños, avoid touching your face, especially your eyes. Capsaicin can cause burning sensations, so be cautious.
3. Wash Your Hands Thoroughly: If you do not wear gloves, wash your hands with soap and water immediately after handling jalapeños, ensuring all traces of the pepper are removed.
4. Remove Seeds Carefully: The seeds and the white pith inside the jalapeño contain the highest concentration of heat. If you prefer a milder flavor, be sure to remove these before pickling.
By following these precautions, you can enjoy your jalapeño preparations without the risk of irritation.
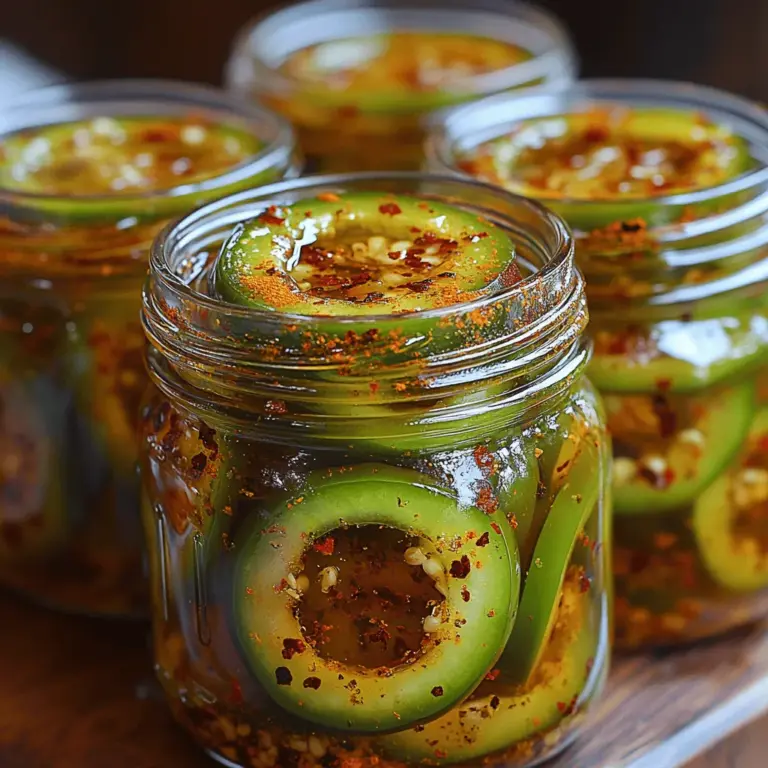
Making the Brine
Importance of Each Step in the Brining Process for Flavor Development
Creating the perfect brine is crucial for developing the distinctive flavor of your Quick & Zesty Jalapeño Pepper Treats. The brine typically consists of vinegar, water, salt, and sugar, each playing a vital role:
– Vinegar: The type of vinegar you choose will influence the overall flavor. Distilled white vinegar provides a sharp tang, while apple cider vinegar adds a subtle sweetness. The acidity in the vinegar is essential for preservation.
– Salt: Salt not only enhances flavor but also helps draw moisture from the jalapeños, intensifying their taste. It also acts as a preservative.
– Sugar: Sugar balances the heat of the jalapeños and enhances the overall flavor profile. Adjust the sugar level to suit your taste—less for a more savory brine, and more for a sweeter kick.
How to Determine the Right Acidity Level for Your Taste
The standard ratio for a brine is typically 1 part vinegar to 1 part water, with varying levels of salt and sugar. However, personal preference plays a significant role in determining the right acidity. To customize your brine:
– Taste Test: Before pouring the brine over the jalapeños, taste it. If it feels too sharp, add more water or sugar; if it lacks tang, increase the vinegar.
– Experiment: Try different types of vinegar or add herbs and spices to tweak the acidity and overall flavor. Fresh herbs like dill or spices like mustard seeds can enhance the brine’s complexity.
Packing the Jars
Techniques for Packing Jars to Maximize Flavor Absorption
Properly packing your jars is vital for ensuring that each jalapeño slice absorbs the brine effectively. Here are some techniques:
1. Layering: Place jalapeño slices in the jar in layers, pressing them down gently to eliminate any air pockets. This ensures a tight fit and better brine absorption.
2. Add Aromatics: Consider adding garlic, onion, or spices between layers of jalapeños for a flavor boost. These ingredients will infuse the brine and the peppers during the pickling process.
Importance of Headspace in Canning
When packing jars, leave about half an inch of headspace at the top. This headspace allows for the expansion of the brine and prevents overflow during the sealing process. It also ensures that the jar can properly seal, preventing spoilage.
Pouring the Brine
Ensuring Even Distribution of Brine and Preventing Air Bubbles
To ensure an effective pickling process, pour the brine over the packed jalapeños slowly and evenly. This helps with:
– Air Bubble Prevention: Use a chopstick or a thin spatula to gently poke around the sides of the jar after pouring the brine. This action helps release any trapped air bubbles, allowing the brine to fully envelop the jalapeños.
Importance of Cleanliness in Sealing Jars
Before sealing the jars, wipe the rims with a clean cloth or paper towel to remove any residue. This step is essential for achieving a proper seal, which is crucial for long-term preservation. A clean rim prevents spoilage and ensures that the lids adhere firmly to the jars.
Sealing and Cooling
Proper Methods for Sealing Jars to Ensure Longevity
Once your jars are filled with jalapeños and brine, it’s time to seal them. Here’s how to do it correctly:
1. Use Proper Lids: Use new canning lids to ensure a secure seal. Avoid reusing old lids, as they may not seal properly.
2. Tighten the Bands: Screw the metal bands onto the jars until they are fingertip tight. Over-tightening can prevent the jars from sealing correctly.
3. Process in a Water Bath: For long-term storage, process the jars in a boiling water bath for 10-15 minutes. This step helps create a vacuum seal.
Understanding the Cooling Process and Its Impact on Flavor
After processing, let the jars cool at room temperature for 12-24 hours. During this time, you’ll notice that the lids will pop down, creating a vacuum seal. Cooling allows the flavors to meld and intensify, giving you the best-tasting Quick & Zesty Jalapeño Pepper Treats.
Storage and Serving Suggestions
Best Practices for Storing Pickled Jalapeños in the Refrigerator
Once your jars are sealed, store them in a cool, dark place. If you’ve processed the jars using a water bath, they can be kept in the pantry until opened. However, for refrigerator storage:
1. Keep Refrigerated: Once opened, store the pickled jalapeños in the refrigerator. They should last for up to two months.
2. Label the Jars: Consider labeling your jars with the date of preparation to keep track of freshness.
How Long the Pickled Jalapeños Can Last and Tips for Freshness
When stored correctly, unprocessed pickled jalapeños can last for up to one year in a cool, dark place. After opening, consume them within two months for the best flavor. To maintain freshness:
– Check for Signs of Spoilage: Always inspect the jars for any signs of spoilage, such as off-smells or mold.
– Use Clean Utensils: When removing jalapeños from the jar, use clean utensils to prevent contamination.
Creative Ways to Incorporate Quick & Zesty Jalapeño Pepper Treats into Meals
These zesty jalapeño peppers are incredibly versatile and can elevate various dishes. Here are some creative ways to use them:
– Topping for Tacos and Nachos: Add pickled jalapeños to your favorite tacos or nachos for an extra kick of flavor. Their tangy taste complements the richness of cheese and meat perfectly.
– Sandwich Enhancer: Layer pickled jalapeños on sandwiches or burgers for an unexpected burst of flavor. They add crunch and spice, balancing out creamy ingredients.
– Salad and Grain Bowl Addition: Toss pickled jalapeños into salads or grain bowls for a zesty twist. They pair well with beans, corn, and avocado, enhancing the overall taste of your meal.
– Dips and Spreads: Incorporate them into dips or spreads for entertaining. Blending pickled jalapeños into cream cheese or hummus creates a delicious, spicy dip that your guests will love.
Conclusion
Quick & Zesty Jalapeño Pepper Treats are not just a side dish; they are a culinary adventure waiting to happen. Their balance of heat and tang makes them a versatile addition to various meals, enhancing the flavors of everything from tacos to sandwiches. Moreover, the satisfaction of creating homemade preserves cannot be overstated. Not only do you control the ingredients and flavors, but you also engage in a rewarding cooking process.
Encourage your culinary creativity by experimenting with different spices and heat levels. Add some cumin or coriander for an earthy twist, or try infusing your brine with fresh herbs for more depth. The possibilities are endless.
With each jar you prepare, you not only preserve the vibrant taste of jalapeños but also enrich your culinary experiences, bringing a burst of flavor to your everyday meals. So gather your ingredients, follow the steps, and enjoy the vibrant world of pickling!
