
Nutty Delight Frozen Yogurt Wedges: A Creamy Treat for Every Occasion
Introduction
Frozen desserts have long been a cherished indulgence, especially as the sun shines brightly and temperatures rise during the warmer months. Among the wide array of frozen options, Nutty Delight Frozen Yogurt Wedges emerge as a standout choice for those looking to cool down while enjoying a sweet treat that is also nutritious. This delightful recipe marries the creamy goodness of Greek yogurt with the satisfying crunch of mixed nuts and granola, creating a dessert that is both delicious and wholesome.
What makes Nutty Delight Frozen Yogurt Wedges particularly appealing is their versatility. Whether you are hosting a summer gathering, enjoying a quiet evening at home, or seeking a healthy snack for the kids, these yogurt wedges fit the bill perfectly. They are simple to prepare, require minimal ingredients, and can be customized to suit various dietary preferences. In this article, we will dive into the step-by-step process of making these delightful wedges, highlighting the health benefits of the ingredients, and providing tips for perfect presentation.
Understanding the Ingredients
To create the perfect Nutty Delight Frozen Yogurt Wedges, it’s essential to understand the key components that make this recipe not only flavorful but also beneficial for your health.
The Role of Greek Yogurt
Greek yogurt is undoubtedly the star ingredient of this recipe. Its thick and creamy texture offers a luxurious mouthfeel that rivals traditional ice cream, while being significantly lower in sugar and higher in protein. A single serving of Greek yogurt can contain twice the protein of regular yogurt, making it an excellent choice for those looking to maintain or build muscle, control hunger, or support overall health.
In addition to protein, Greek yogurt is rich in probiotics, which are beneficial bacteria that promote gut health. This makes Nutty Delight Frozen Yogurt Wedges a satisfying treat that can also contribute to your daily nutritional needs. For those with dietary restrictions, Greek yogurt can be found in various formulations, including lactose-free options, ensuring that everyone can enjoy this creamy delight.
Natural Sweeteners: Honey and Maple Syrup
Sweetening the yogurt mixture can be achieved using natural sweeteners such as honey or maple syrup. Both options not only add a touch of sweetness but also bring their unique flavors and health benefits to the table.
Honey is known for its antimicrobial properties and can provide a quick energy boost due to its natural sugars. It also offers a distinct floral flavor that can complement the richness of the yogurt beautifully. On the other hand, maple syrup is rich in antioxidants and minerals, including manganese and zinc, making it a nutritious alternative. Choosing between honey and maple syrup allows for flexibility in flavor and dietary preferences, allowing you to customize the taste of your yogurt wedges to suit your palate.
Adding Crunch: Mixed Nuts and Granola
To elevate the texture of the Nutty Delight Frozen Yogurt Wedges, the addition of mixed nuts and granola is essential. This combination not only enhances the overall crunch but also contributes significant nutritional value. Mixed nuts are a powerhouse of healthy fats, protein, and fiber, making them an ideal addition for those seeking a balanced diet. Almonds, walnuts, and pecans can all be included in your nut mix, each bringing its own flavor and health benefits.
Granola adds another layer of texture while providing additional fiber and whole grains. It can also be a source of sweetness, especially if it contains dried fruits or sweeteners. When selecting granola, look for options with minimal added sugars and whole ingredients to keep your dessert as healthy as possible.
Optional Ingredients: Coconut and Chocolate Chips
For those looking to elevate their Nutty Delight Frozen Yogurt Wedges even further, consider incorporating optional ingredients like unsweetened shredded coconut and mini chocolate chips. Shredded coconut can lend a tropical flair to your yogurt wedges, enhancing both flavor and texture while providing healthy fats and fiber.
Mini chocolate chips can add a hint of indulgence, making your frozen treat feel even more like a dessert. While they are optional, their inclusion can satisfy chocolate cravings without overwhelming the health benefits of the dish.
Step-by-Step Instructions
Having explored the ingredients, let’s dive into the preparation process, which is straightforward and can be completed in just a few steps.
Preparing the Yogurt Mixture
Start by gathering your ingredients and a large mixing bowl. In the bowl, combine the Greek yogurt, your chosen sweetener (either honey or maple syrup), and a splash of vanilla extract. Using a whisk or spatula, mix thoroughly until you achieve a smooth and creamy texture. The goal here is to blend the ingredients seamlessly, ensuring that the sweetness is evenly distributed throughout the yogurt.
If you prefer a sweeter profile, feel free to taste the mixture and adjust the sweetener to your liking. This step is crucial as it sets the foundation for the overall flavor of your frozen yogurt wedges.
Incorporating Mix-Ins
Once your yogurt mixture is perfectly blended, it’s time to incorporate the mix-ins. Gently fold in the coarsely chopped mixed nuts, granola, and any optional ingredients like shredded coconut or mini chocolate chips. This step is vital for ensuring that each wedge is packed with flavor and texture.
Be careful not to overmix; you want to maintain the integrity of the yogurt while distributing the mix-ins evenly throughout the mixture. The result should be a deliciously crunchy and creamy blend that will freeze beautifully into wedges.
With these initial steps, you are well on your way to creating Nutty Delight Frozen Yogurt Wedges that not only satisfy your sweet tooth but also nourish your body. The next part of the recipe will guide you through the freezing process and presentation tips, ensuring that your frozen desserts look as good as they taste. Stay tuned for a delightful continuation of this frozen yogurt journey!
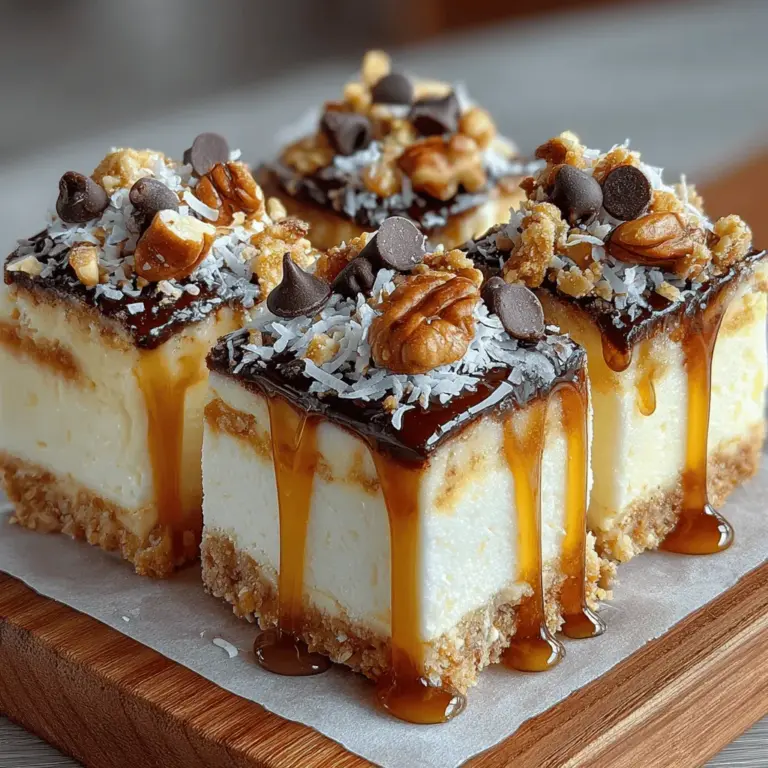
{{image_2}}
Lining the Baking Dish
To begin crafting your Nutty Delight Frozen Yogurt Wedges, start by preparing your baking dish. Take a standard 9×9 inch square baking dish or a similarly sized rectangular dish, and line it with parchment paper. This step is crucial as it not only allows for easy removal of the frozen yogurt slab but also helps maintain the clean shape of your wedges. Ensure that the parchment paper hangs over the edges of the dish; this will create convenient handles for lifting the yogurt out once it’s frozen. If you don’t have parchment paper, you can lightly grease the dish, but parchment provides the best results for clean extraction.
Pouring and Spreading the Mixture
With your baking dish lined and ready, it’s time to pour the yogurt mixture into the prepared dish. Carefully transfer the creamy yogurt blend into the center of the dish. Using a spatula, gently spread the mixture evenly across the bottom of the dish. Aim for a thickness of about half an inch. This thickness is ideal as it allows the yogurt to freeze evenly, ensuring that each wedge will have the perfect texture upon serving. Take your time with this step to make sure the surface is smooth; a well-spread mixture leads to beautifully shaped wedges that are not only delicious but also visually appealing.
Freezing the Wedges
Now that your yogurt mixture is spread out evenly, it’s time to place the baking dish in the freezer. Allow the yogurt to freeze for approximately 4 to 6 hours. This duration is essential for achieving the optimal texture—smooth, creamy, and just firm enough to hold its shape without being overly hard. For best results, check the yogurt after about 4 hours to see if it has reached the desired firmness. If it’s still too soft, give it a little more time. Once fully frozen, it should have a consistency similar to that of traditional ice cream, making it perfect for slicing into wedges.
Cutting the Wedges
After the freezing time has elapsed, you can now cut your Nutty Delight Frozen Yogurt Wedges. Carefully remove the baking dish from the freezer. Using the parchment paper overhang, lift the entire slab of yogurt out of the dish. Place it on a cutting board to make slicing easier. Using a sharp knife, cut the slab into wedges or bars, depending on your preference. For clean edges, wipe the knife with a damp cloth between cuts. This will help prevent the yogurt from sticking to the knife, ensuring each wedge maintains its shape. Once cut, you can serve immediately or store the wedges in an airtight container in the freezer for later enjoyment.
Serving Suggestions
Presentation Techniques
To elevate your serving experience, consider how you present your Nutty Delight Frozen Yogurt Wedges. Arrange the wedges artfully on a serving platter. A simple yet effective technique is to stack a few wedges slightly askew, which adds height and interest to your presentation. For an extra touch, you can garnish the wedges with additional toppings such as crushed nuts, granola, or shredded coconut. These garnishes not only enhance the visual appeal but also add texture and flavor, making each bite more exciting. The vibrant colors of the garnishes can make your dessert more inviting, enticing guests to indulge.
Nutritional Benefits of Nutty Delight Frozen Yogurt Wedges
Health-Conscious Indulgence
One of the best aspects of Nutty Delight Frozen Yogurt Wedges is that they provide a health-conscious way to satisfy your sweet cravings. Made primarily from Greek yogurt, this dessert is rich in protein, helping to keep you fuller for longer. Greek yogurt also contains probiotics, supporting gut health and digestion. The addition of nuts contributes healthy fats, fiber, and essential vitamins, making these wedges a nutritious treat. Unlike store-bought frozen desserts, which may contain excessive sugars and artificial ingredients, these homemade wedges allow you to control the ingredients and customize them to fit your dietary needs.
Customizable for Dietary Preferences
This recipe is wonderfully versatile, allowing for modifications to cater to various dietary preferences. For those who are gluten-free, simply opt for gluten-free granola or nuts as toppings. If you’re vegan, consider substituting the Greek yogurt with a plant-based yogurt alternative such as coconut or almond yogurt, and use maple syrup or agave as a sweetener. The possibilities are endless, allowing you to tailor the flavors and textures to suit your taste and dietary restrictions. This adaptability makes Nutty Delight Frozen Yogurt Wedges a delightful option for gatherings where guests may have differing dietary needs.
Conclusion
Nutty Delight Frozen Yogurt Wedges offer a scrumptious way to enjoy a frozen dessert without the guilt. With their creamy texture, delightful crunch, and nutritional benefits, these wedges are perfect for any occasion. Whether served at a summer gathering or enjoyed as a healthy snack, this recipe is sure to please both kids and adults alike. By understanding the ingredients and following the step-by-step instructions, you can create a delicious treat that is both satisfying and nutritious. Embrace the joy of homemade frozen yogurt and indulge in these delightful wedges today!
Your friends and family will appreciate the effort you put into making this wholesome dessert, and you’ll relish the deliciousness that comes from knowing exactly what goes into your food. So, grab your ingredients, get started, and enjoy the refreshing taste of Nutty Delight Frozen Yogurt Wedges anytime you desire!
