Go Back
Frozen yogurt has skyrocketed in popularity over the past few years, becoming a staple in dessert shops and a favorite among health enthusiasts. What’s not to love about a dessert that is both satisfying and guilt-free? The appeal of frozen yogurt lies in its versatility; it can be enjoyed in a multitude of flavors, and it serves as a blank canvas for various toppings. Additionally, making frozen yogurt at home allows you to control the ingredients, ensuring that you can create a version that meets your dietary preferences and tastes.

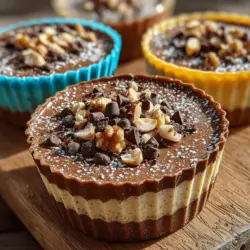
Frozen Chocolate Hazelnut Yogurt Cups

Beat the summer heat with these deliciously healthy Frozen Chocolate Hazelnut Yogurt Cups! This easy recipe combines rich chocolate and nutty hazelnuts with creamy Greek yogurt, offering a guilt-free treat that satisfies your sweet tooth while nourishing your body. Packed with protein and probiotics, these cups are customizable to suit any dietary preference. Perfect for parties or a refreshing snack, get ready to indulge in a dessert that’s both dreamy and nutritious!

Ingredients
  

2 cups Greek yogurt (plain or vanilla for sweetness)

1/2 cup chocolate hazelnut spread (like Nutella)

1/4 cup honey or maple syrup (adjust sweetness to taste)

1 teaspoon pure vanilla extract

1/2 cup crushed hazelnuts (lightly toasted for enhanced flavor)

A pinch of sea salt

Optional toppings: mini chocolate chips, extra crushed hazelnuts, or fresh berries

Instructions
 

Prepare the Mixture: In a large mixing bowl, add the Greek yogurt, chocolate hazelnut spread, honey (or maple syrup), vanilla extract, and a pinch of sea salt. Using a whisk or spatula, mix all the ingredients thoroughly until you achieve a smooth and creamy consistency.

    Add Texture: Gently fold in the toasted crushed hazelnuts using a spatula. Ensure they are evenly distributed throughout the yogurt mixture for a delightful crunch in every bite.

      Spoon into Molds: With a tablespoon or piping bag, carefully spoon the chocolate hazelnut yogurt mixture into silicone muffin molds or cupcake liners. Fill each mold approximately three-quarters full, leaving room for the mixture to expand as it freezes.

        Smooth the Tops: Using a spatula or the back of a spoon, smooth out the tops of the yogurt cups to create an even, flat surface. This will make them look more appealing when served.

          Freeze: Place the filled molds in the freezer and allow the yogurt cups to freeze for at least 4 hours, or until they are completely firm.

            Remove from Molds: Once fully frozen, remove the yogurt cups from the molds by gently pressing from the bottom. If they are sticking, run warm water over the outside of the mold for a few seconds to help release them more easily.

              Serve & Enjoy: Serve the frozen yogurt cups immediately as a refreshing treat, or store them in an airtight container in the freezer for up to 2 weeks. Before serving, feel free to garnish with mini chocolate chips, additional crushed hazelnuts, or a handful of fresh berries for an extra touch of flavor and decoration.

                Prep Time, Total Time, Servings: 15 minutes | 4 hours (freezing) | Makes 12 servings.